

Build trust and keep customers engaged with a fully customizable tracking page on your own store domain.
Note
When customers use their tracking number on external logistics sites like 17TRACK, they often see that the package shipped from China—which can hurt trust and brand perception. DSers Tracking Page lets you design a branded tracking experience that keeps customers on your store domain and reinforces your brand with every status check.Click here to start dropshipping now with DSers
Overview
The DSers Tracking Page lets you create a fully branded tracking page for your Shopify store. Instead of sending customers to other tracking logistics website, they see your store logo, name, and logistics info while tracking their orders—creating a professional, trustworthy post-purchase experience.
Supported plans: Advanced, Pro, and Enterprise
Supported platform: Shopify only
How to Create a Tracking Page
Step 1: Access and create
Create a Tracking Page
- Go to Tracking > Tracking page.
- If you haven't created a page yet, you'll see a preview of the default layout.
-
Click CREATE PAGE

-
Select your Shopify store.
Each store can have one tracking page.
Stores that already have a page aren't selectable. -
Click Create
 to open the Edit drawer.

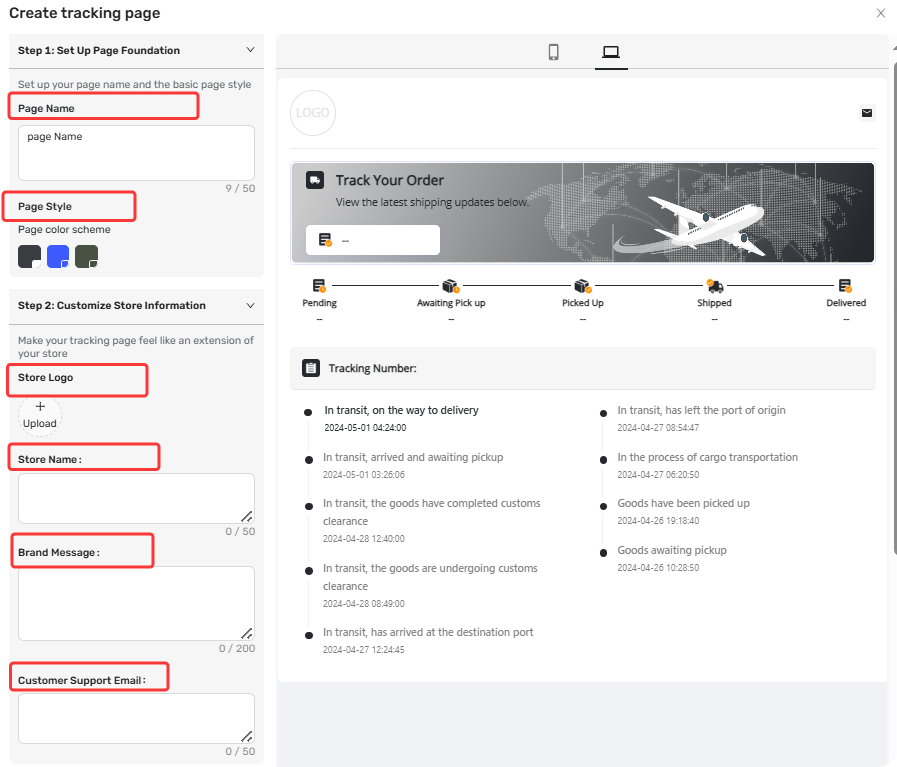
Step 2: Set Up Page Foundation and Customize Store information
| Field | Required? | Details |
|---|---|---|
| Page Name | ✅ Yes | Max 50 characters |
| Store Name | ✅ Yes | Max 50 characters |
| Store Logo | Optional | JPG or PNG, under 10MB. Upload, preview, or delete as needed |
| Brand Message | Optional | Max 200 characters. Use for shipping policies or friendly messages |
| Customer support Email | Optional | Customer contact you via this email |
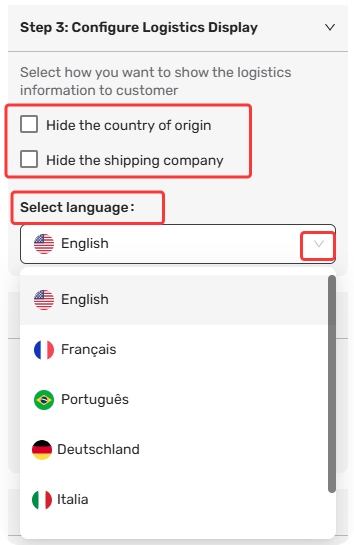
Step 3: Customize logistics display and Choose your page language
- Under Logistic Info Settings, you can:
- Hide the name of original country – Remove shipping origin from the timeline
- Hide the shipping company – Remove carrier name
2. Select your preferred page language from the drop-down list. This determines the language DSers uses when pulling tracking updates from the logistics provider.
Step 4: Add upsell products (Pro/Enterprise only)
To showcase your products on the tracking page and turn order tracking into extra sales, check Upsell Settings.
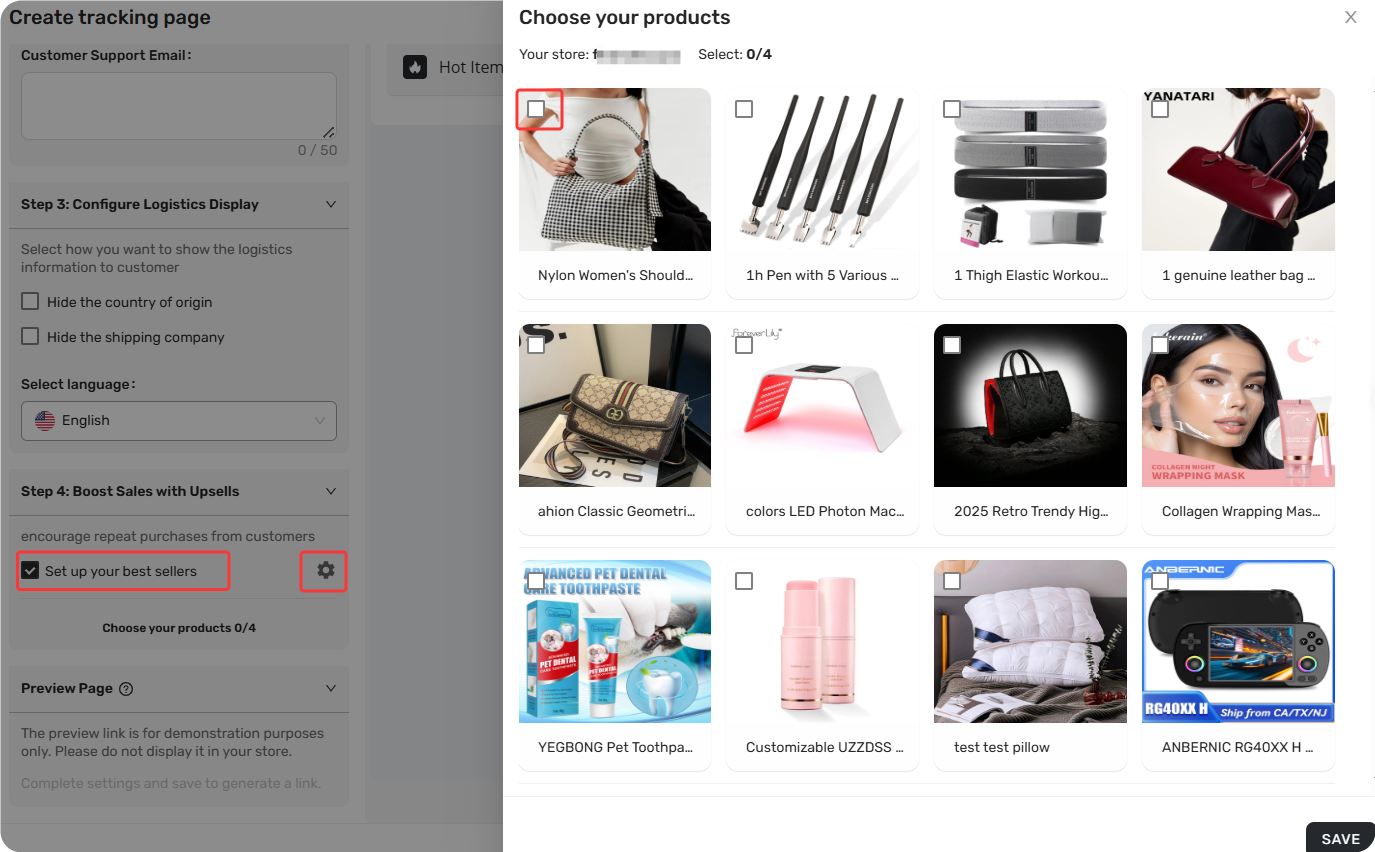
For a complete guide on setting up and maximizing this feature, see our related article: Tracking Upsell: Turn Order Tracking into Extra Sales.
Step 5: Save your page
- The right panel shows a live preview as you make changes—toggle between mobile and desktop views.
- Once you've completed your settings, a preview link auto-generates.
- Click Save (Page Name and Store Name are required).
Tip: The preview link is for demo purposes only—don't share it publicly in your store.
How to Manage Your Tracking Page
Once created, your tracking page appears in the Tracking Page list. From here, you can:
| Action | Description |
|---|---|
| Activate | Make your page live. This updates the tracking URL in your Shopify settings to your-store.com/dsers-track. |
| Deactivate | Take your page offline. Status changes to Draft. |
| Edit | Reopen the Edit drawer to update any settings. |
| Delete | Permanently remove the page. Only available for Draft (deactivated) pages. |
Note: Pages auto-deactivate if your plan expires or downgrades below Advanced.
Customize your tracking page link
If you prefer a different tracking page URL—for example, if you don't want "dsers-track" in the link—you can customize it. For a complete guide, see: How to Set Up Your Custom Tracking URL.
Customer Experience
How customers access your tracking page
Customers reach your tracking page through their shipping confirmation email.
Frequently Asked Questions
Quick answers to the most common questions about DSers Tracking Page feature.
Get Started Now to Grow Your Online Business with the DSers!


 Company
 Why Choose DSers
 Blog
Blog
 Help Center


